Does your kitchen always feel cluttered, no matter how hard you try to keep it organized? If so, you’re not alone! A messy kitchen can make meal prep stressful, but the good news is that a few simple changes can transform it into a highly efficient, clutter-free space.
In this post, we’re sharing 8 easy and inexpensive kitchen organization ideas that will help you maximize storage, reduce clutter, and make your kitchen both stylish and functional. Read on for some expert-backed kitchen organization hacks that will make your space easier to use and more enjoyable to spend time in!
If you’d rather watch my YouTube Video on this topic, check it out here:
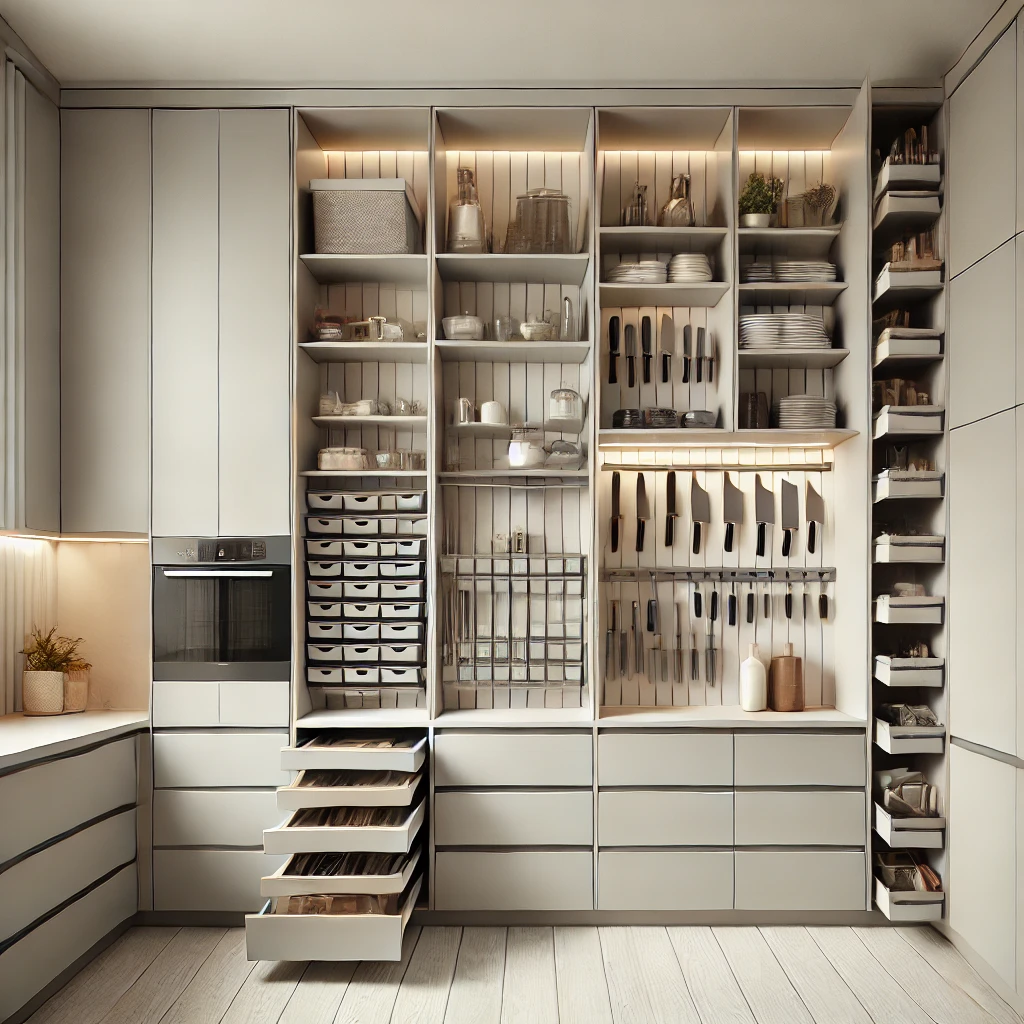
1. Install Pull-Out Shelves for Easy Access
Have you ever struggled to reach items in the back of a cabinet, especially when you’re in a rush? Pull-out shelves are one of the best kitchen organization ideas to solve this problem. By allowing you to slide out an entire shelf, these organizers make every item—whether it’s pots, pans, or pantry staples—easily accessible. According to Better Homes & Gardens, pull-out shelves are a game-changer for deep cabinets, turning even hard-to-reach areas into functional storage spaces.
2. Use Drawer Dividers to Tame Your Utensils
Kitchen drawers can quickly become a tangled mess of utensils, making it hard to find what you need. One of the simplest but most effective kitchen organization hacks is to add adjustable drawer dividers. These customizable dividers give each item its own space, keeping everything neatly organized and easy to find. Real Simple recommends using drawer dividers to maximize storage and avoid that dreaded utensil jumble.
3. Keep Items in Sight with a Lazy Susan
Ever lost track of pantry items because they were buried in the back of a cabinet? A Lazy Susan could be your solution! These rotating trays keep everything visible and within reach. Lazy Susans are especially useful in deep cabinets or pantry corners, ensuring that nothing gets lost or forgotten. This simple tool makes your kitchen more efficient and helps you avoid unnecessary food waste.
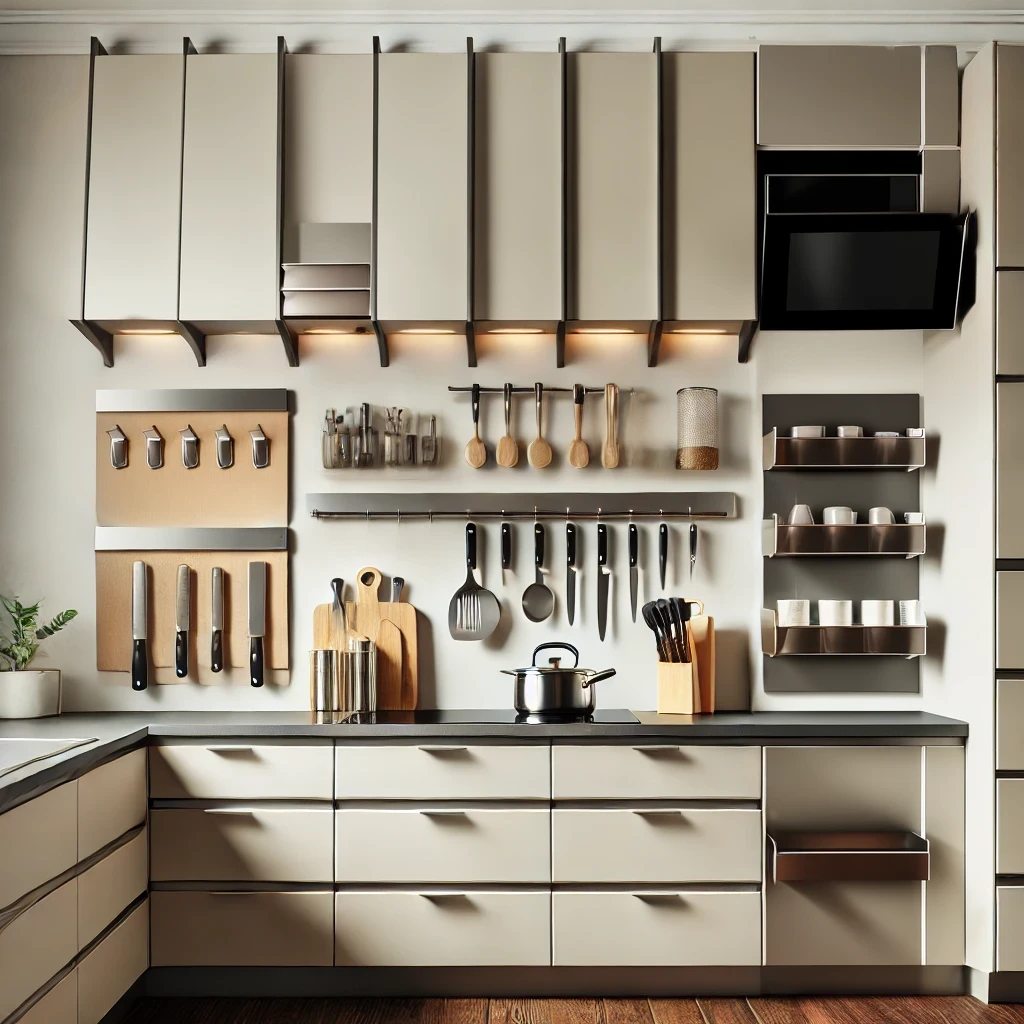
4. Maximize Wall Space with Vertical Storage
When thinking about kitchen organization, don’t forget your walls! Vertical storage solutions, like hooks, magnetic strips, or pegboards, can turn unused wall space into functional storage for utensils, pots, pans, and spices. Not only does this free up counter space, but it also creates a sleek, modern look that keeps everything you need within arm’s reach.
5. Organize Corner Cabinets with Pull-Out Shelves
Corner cabinets can feel like a black hole for kitchen items, but they don’t have to be. Adding a Lazy Susan or a tiered pull-out shelf can transform these tricky spaces into organized and accessible storage areas. By maximizing every inch of your cabinet space, you’ll make sure that no pot or pan is left behind.
6. Dollar Store Baskets for Pantry Organization
For a budget-friendly kitchen organization hack, head to your local dollar store! Simple plastic or wire baskets are perfect for grouping similar items in your pantry. Whether it’s snacks, baking supplies, or canned goods, these baskets help keep everything organized and easy to find. Labeling each basket adds another layer of order to your kitchen, making it easier to stay organized long-term.
7. Hang Over-the-Door Hooks for Extra Storage
Need more space? Over-the-door hooks or baskets can provide an easy storage solution for items like dish towels, spices, or cleaning supplies. By utilizing the inside of your pantry or cabinet doors, you free up valuable counter space while keeping essentials close at hand.
8. DIY Drawer Dividers
Fancy drawer dividers can be pricey, but did you know you can make your own with materials you already have at home? Using foam board or cardboard, you can create custom-sized dividers to perfectly organize your utensils and gadgets. It’s a simple, budget-friendly way to keep your kitchen drawers tidy without breaking the bank.
Final Thoughts
With these kitchen organization ideas, you’ll have your space decluttered and running more smoothly in no time. Whether you’re looking for kitchen organization hacks to maximize storage or simple ways to beautify your space, these tips will help transform your kitchen into a functional, stylish, and clutter-free haven.
Is your living room feeling cramped and uninspired? You’re not alone! Small living spaces can be a real challenge to design. With limited space, awkward layouts, and the need to balance style with functionality, finding the perfect layout can seem impossible. But don’t worry! In this blog post, we’ll explore several small living room layout ideas that will transform your space, making it feel more open, inviting, and functional. Whether you’re dealing with a long, narrow room, a square space, or a room with odd angles, these tips will help you make the most of every inch.
By the way, I’ve got a YouTube video on this same topic, check it out here:
Understanding the Challenges of Small Living Rooms
Small living rooms come with their own set of challenges. From limited square footage to awkward layouts, it can be difficult to create a space that is both functional and stylish. But with a well-thought-out living room layout, you can turn even the smallest room into a cozy and inviting space. The key is to make the most of what you have, using strategic furniture placement and clever design tricks to maximize your space.
Key Principles of Small Living Room Design
Before diving into specific small living room layout ideas, it’s important to understand a few key principles of small space design:
Scale and Proportion: Choose furniture that fits the scale of your room. Opt for compact, multi-functional pieces that don’t overwhelm the space. For example, a sleek sofa with built-in storage can provide seating and storage without taking up too much room.
Creating Zones: In a small living room, it’s essential to define different zones. This could be a seating area, a reading nook, or even a small workspace. By creating distinct zones, you can make the space feel more organized and larger than it actually is.
Utilizing Vertical Space: Don’t forget to think vertically! Wall-mounted shelves, tall bookcases, and hanging decor can help draw the eye upward, freeing up valuable floor space and making the room feel taller.
Practical Small Living Room Layout Ideas
Now that we’ve covered the basics, let’s dive into some practical small living room layout ideas that will transform your space.
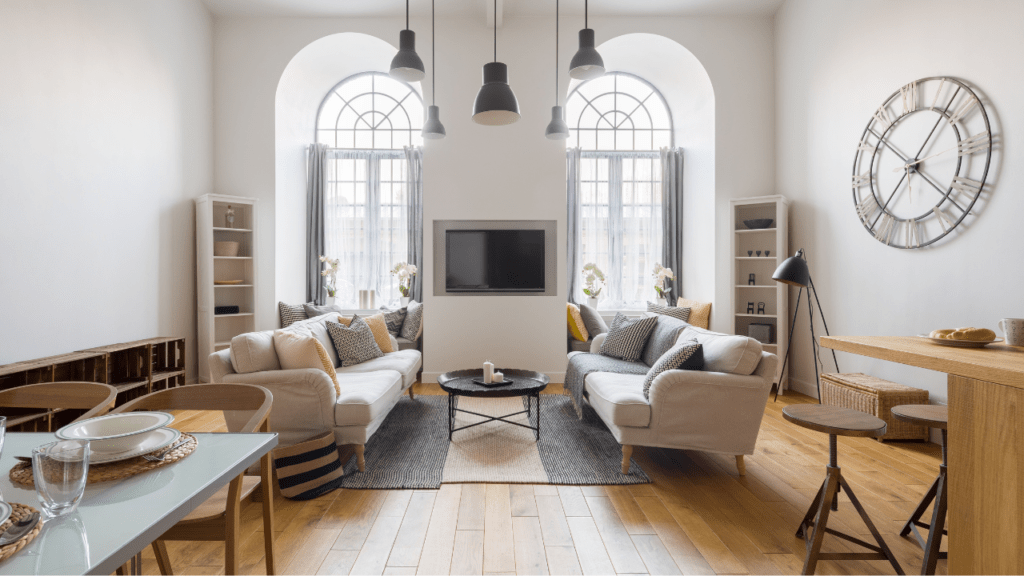
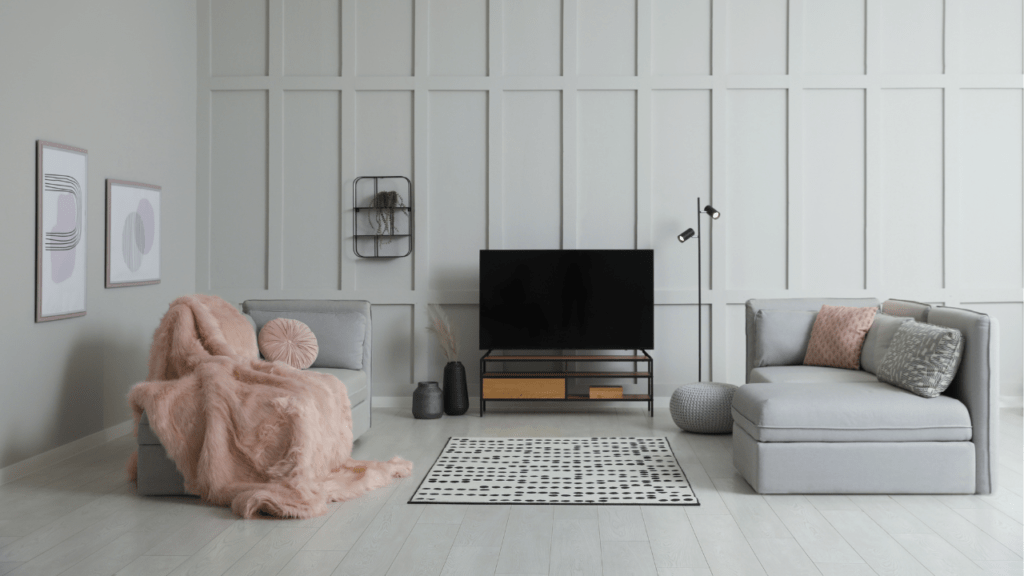
1. The L-Shaped Arrangement
One of the most effective small living room layouts is the L-shaped arrangement. This layout maximizes seating while keeping the room open and inviting. By placing an L-shaped sofa or sectional in a corner, you create a cozy seating area that feels intimate without sacrificing space. This layout also improves traffic flow, guiding movement through the room and leaving plenty of space for additional furniture, like a coffee table or side chair. To enhance this layout, consider adding a side table and floor lamp to the open side of the sofa to anchor the space and make it feel like a well-thought-out nook.
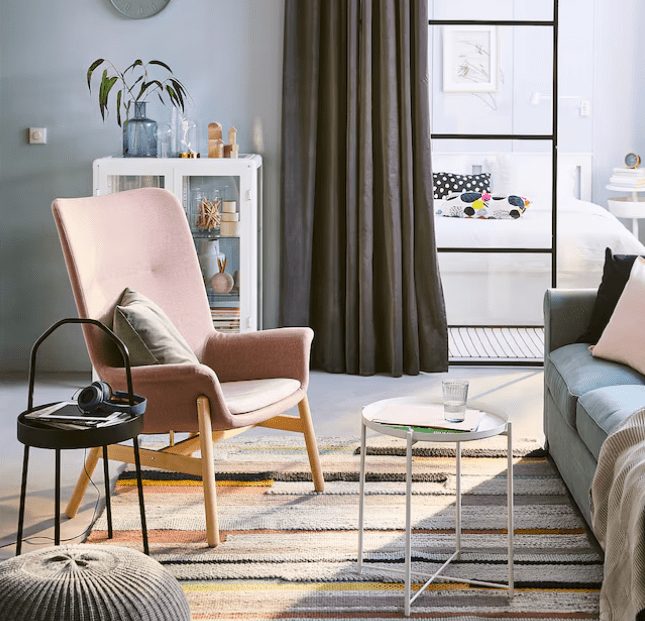
2. Floating Furniture
Another great layout idea for small living rooms is floating your furniture. Instead of pushing all your furniture up against the walls, try pulling your sofa away from the wall and placing it more centrally in the room. This creates a more defined living area that feels spacious and open. A rug underneath the sofa can help to anchor the space, making it clear that this is the seating zone. This layout also opens up the perimeter of the room, which can be used for additional decor or even a narrow console table against the wall for extra storage or display space.
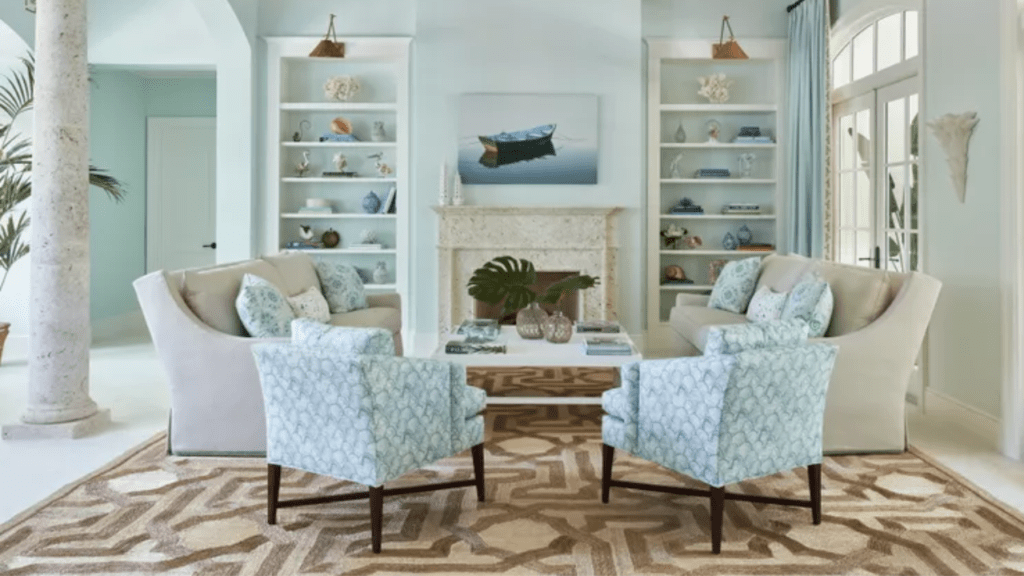
3. The Symmetrical Layout
For those who love balance and order, the symmetrical layout is a great option. This layout involves creating a mirror image on either side of a central focal point, like a coffee table or fireplace. By placing identical pieces of furniture—like two armchairs or two side tables—on either side of a focal point, you create a balanced, cohesive look that’s both visually pleasing and functional. This layout works particularly well in square rooms, where the symmetry helps to fill the space evenly and make it feel grounded and inviting.
4. The Multi-Zone Layout
If your living room needs to serve multiple functions, consider a multi-zone layout. This is perfect for small living rooms that need to accommodate a seating area, a reading nook, and a small workspace, all in one room. Start by defining each zone with area rugs and strategic furniture placement. For example, a rug under your sofa and coffee table can mark the seating area, while a different rug or even just a chair and lamp in a corner can create a cozy reading nook. A small desk against a wall or in an alcove can serve as a workspace. The key to making this layout work is ensuring that each zone feels distinct yet cohesive with the rest of the room.
5. The Circular Flow Layout
The circular flow layout is ideal for creating a natural flow in your living room, encouraging movement and conversation. Arrange your furniture in a circular pattern around a central point, like a coffee table or ottoman. This layout is perfect for small living rooms that double as a social space, creating an inclusive environment that’s great for conversation. The circular arrangement also guides traffic around the room, creating a smooth, continuous flow that makes the space feel more open and connected.
Clever Storage Solutions for Small Living Rooms
In addition to choosing the right living room layout, clever storage solutions can help keep your space tidy and clutter-free. Here are some ideas to consider:
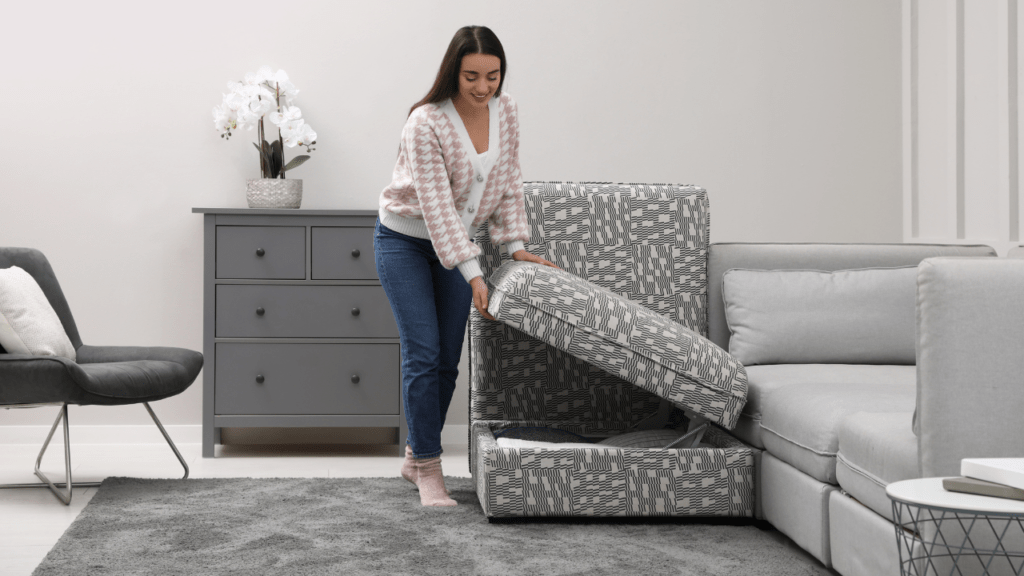
Multi-Functional Furniture: Look for furniture pieces that serve more than one purpose, such as ottomans with hidden storage, coffee tables with compartments, and wall-mounted units that keep your floor space clear.
Built-In Storage: Incorporating built-in storage solutions can save space and reduce clutter, making your room feel larger and more organized.
Hidden Storage Hacks: Get creative with hidden storage solutions, such as under-sofa storage, stylish baskets, or floating shelves that double as decor.
Innovative Layout Solutions for Unique Room Shapes
Not all living rooms are created equal. Some are long and narrow, some are square, and some have odd angles or alcoves. Here are some layout ideas for those tricky spaces:
Long and Narrow Living Rooms: Create a cohesive layout by breaking the room into functional zones. Area rugs can help define these zones—like a seating area at one end and a reading nook at the other. This approach makes the room feel more cohesive and less like a hallway.
Square Living Rooms: Try a symmetrical layout to maximize space and create a cozy, intimate atmosphere. Center your furniture around a focal point, like a coffee table or fireplace, and use identical pieces on either side to create a balanced look.
Rooms with Odd Angles or Alcoves: Use custom or modular furniture to make the most of these spaces. Turn quirks into features by incorporating furniture that fits perfectly into odd angles or alcoves.
The Bold, Surprising Tip: The Modular, Transformable Living Room
And now, for the boldest tip of all: the modular, transformable living room. Imagine a space where your furniture can easily be rearranged or transformed to serve multiple functions, depending on what you need that day. Think sectional sofas that split into individual seats, modular shelving that can be reconfigured, or tables that adjust in height. This approach lets you reinvent your living room without buying new furniture, keeping your space fresh and functional, no matter what life throws at you.
Conclusion
Creating the perfect small living room layout doesn’t have to be a daunting task. With the right strategies and a bit of creativity, you can turn even the smallest space into a cozy and functional living area.
Now that you’ve mastered the layout of your living room, you still need to decorate it to look like a million bucks? Well this video on how to create a luxury living room for less should help you out. Check it out here:
6 Timeless Interior Design Hacks from Top Designers for 2024
Are you dreaming of a home that never goes out of style? If so, you’re in the right place! In 2024, timeless design is more relevant than ever, with homeowners seeking to create spaces that blend classic elements with modern touches. Today, I’m sharing six timeless interior design hacks straight from top designers that will help you achieve a stunning, enduring look for your home.
If you also want to check out my YouTube Video on this topic, check it out here:
1. Choose a Neutral Color Palette
One of the most crucial interior design tips for 2024 is to start with a neutral color palette. Timeless interior design often begins with shades like white, beige, and soft greys. These colors provide a versatile backdrop that allows you to incorporate seasonal trends without overwhelming your space. Whether you’re planning a timeless kitchen design or a timeless bathroom design, neutral tones will keep your home looking fresh and sophisticated year after year.
2. Incorporate Natural Materials
Bringing natural materials into your home is another key to achieving a timeless design. Materials like wood, stone, and natural fibers add warmth and texture to any space. Whether it’s wooden beams in your living room or marble countertops in your kitchen, these elements contribute to a design that feels both luxurious and enduring.
3. Mix Old and New
One of the most exciting home decor tips is the blend of old and new elements. Mixing vintage pieces with modern furnishings creates a layered, curated look that feels authentic and timeless. Imagine pairing a vintage chandelier with sleek, contemporary furniture—this contrast is what makes timeless interior design so compelling.
4. Focus on Quality Over Quantity
In 2024, the emphasis is on quality over quantity. Investing in well-made furniture and decor that will stand the test of time is a cornerstone of timeless design. Whether you’re updating your kitchen or planning a bathroom remodel, choose materials and pieces that are built to last.
5. Keep It Simple
Simplicity is at the heart of timeless interior design. This year, we’re seeing a return to clean lines and uncluttered spaces. Focus on creating rooms that are functional, comfortable, and free from unnecessary decor. This approach not only makes your home more livable but also ensures it remains stylish for years to come.
6. Use Timeless Patterns and Textures
Patterns like stripes, plaids, and herringbone have been around for decades, and they’re not going anywhere. Incorporating these classic patterns into your home—whether through textiles, wallpaper, or tile—can add a touch of timeless elegance. Similarly, textures like velvet, linen, and wool bring depth and interest to your interiors.
Conclusion
By following these timeless interior design hacks, you’ll create a home that feels stylish and enduring in 2024 and beyond. Whether you’re updating a single room or embarking on a full renovation, these interior design tips will help you achieve a look that never goes out of style. Remember, timeless design is all about blending the old with the new, focusing on quality, and keeping things simple yet elegant.
(Note: some of these are affiliate links. As an Amazon associate, I earn an affiliate commission, at no extra cost to you.)
As summer nights stretch out longer, there’s nothing quite like gathering around a fire pit with friends and family. Whether you’re roasting marshmallows, sharing stories, or simply enjoying the warmth, a fire pit can transform your backyard into a cozy retreat. Here are the top five fire pits for summer fun, ranked in order of awesomeness, with the best saved for last.
5. Bali Outdoors Wood Burning Fire Pit
Why People Like It:
Versatile Design: This fire pit features a grill attachment, making it perfect for BBQs.
Durability: Made with sturdy steel, it’s built to last through many seasons.
Affordability: A great option for those on a budget without sacrificing quality.
A fire pit can be the highlight of your summer evenings, offering warmth, light, and a central spot for socializing. Whether you prefer the simplicity of a wood-burning fire pit or the convenience of a propane model, there’s something for everyone on this list. The Sunnydaze Crossweave Outdoor Fire Pit takes the top spot for its stunning design and ample fire capacity, making it the perfect choice for unforgettable summer nights.
Are you ready to transform your home with some of the best IKEA products recommended by top interior designers? In this blog post, we’ll reveal 21 hidden gems from IKEA that will elevate your home decor without breaking the bank. From stylish sofas to chic decor, these designer favorites are sure to inspire your next home makeover. We saved the most surprising IKEA hidden gem at the end, so make sure to check that out!
If you’d like to see the video I did on this same topic, check it out here:
The Morabo Sleeper Sofa is a versatile and stylish choice perfect for small spaces. With its sleek design and high-quality fabric, this sofa bed offers a premium look. It’s ideal for small apartments or guest rooms, providing both seating and sleeping options. This sofa is highly recommended by interior designers like Lone Fox for its functionality and elegance.
The SÖDERHAMN Sofa Series is a modular sofa with various configurations, allowing you to customize it to fit any living space. Its deep seats and comfortable cushions make it a highly desirable piece that can be tailored to your needs. Designers love its versatility and modern design, making it a favorite in many homes.
The HEMNES Bed Frame is a classic, solid pine bed frame with a white lacquered finish. Its traditional design fits well in cozy, country-style bedrooms, offering durability and timeless appeal. Designer Nick Lewis highlights the HEMNES Bed Frame for its solid construction and classic aesthetics, making it a favorite for creating a cozy bedroom vibe.
The Bondholmen Rocking Chair combines natural materials with modern design, adding a unique and cozy element to any living space. Its stylish and comfortable build makes it a standout piece. This chair is praised by interior designers for its ergonomic design and suitability for both indoor and outdoor spaces.
The VEDBO Armchair offers a high backrest and elegant fabric, making it perfect for living rooms or reading nooks. Its sleek design ensures it will blend seamlessly into various decor styles. Designers recommend the VEDBO Armchair for its comfort and versatility, fitting well into both modern and traditional interiors.
Available in vibrant colors like orange, the ÖRFJÄLL Swivel Chair is a stylish and functional office chair. It’s affordable and adds a fun touch to workspaces. This chair is a favorite among designers for its ergonomic design and playful color options, making it perfect for home offices.
The SKOGSTA Bench, made from solid acacia wood, is perfect for adding a rustic touch to your dining area or hallway. Its robust construction and natural wood finish make it both durable and visually appealing. Designers appreciate the SKOGSTA Bench for its sturdy build and natural aesthetics, ideal for rustic and farmhouse stylee.
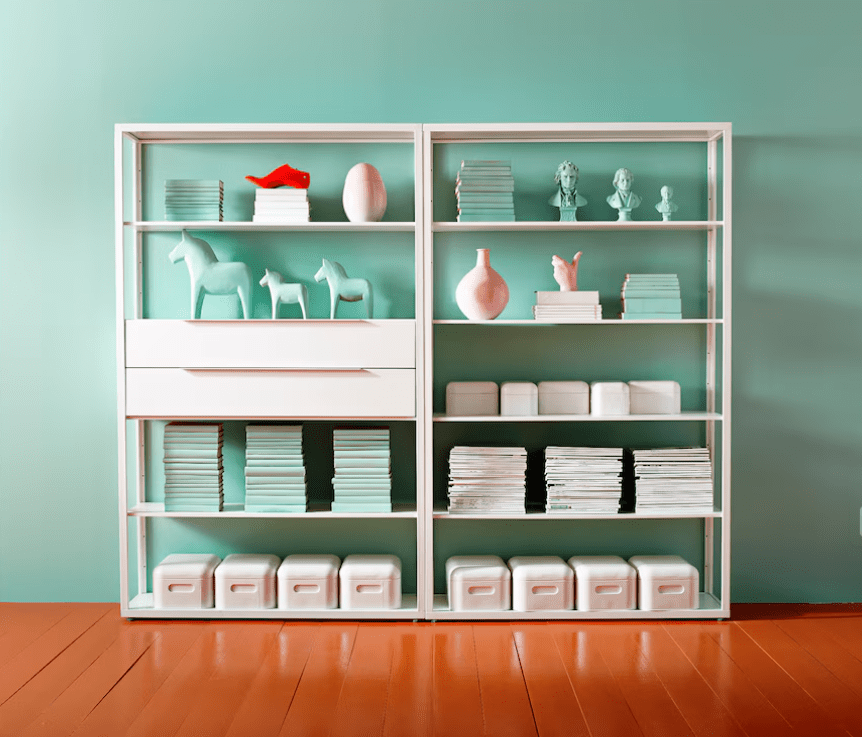
The BESTÅ Storage Unit is a versatile piece that can be customized with different fronts and legs. It provides ample storage and looks built-in when multiple units are combined, blending seamlessly into interiors. Interior designers love the BESTÅ system for its flexibility and ability to be tailored to fit any room.
The IVAR Shelf Unit is a solid pine shelving system that can be painted or customized to fit any decor style. It’s ideal for adding storage and display space in various rooms. Recommended by designers for its DIY potential, the IVAR Shelf Unit can be transformed with paint or stains to match any interior theme.
The FJÄLKINGE Shelving Unit features a sleek and modern design with adjustable shelves, making it perfect for displaying books, plants, and decorative items. Designers favor this shelving unit for its minimalist aesthetic and practicality in various settings.
The TARVA Nightstand is made of solid pine and features a simple design. It’s easy to paint or customize, making it a versatile and affordable option for various bedroom styles. Interior designers recommend the TARVA Nightstand for its customizability, allowing homeowners to paint or stain it to suit their decor.
The BJÖRKSNÄS Chest of Drawers features a Scandinavian style with leather tab handles. This piece provides stylish storage for bedrooms and living areas with its timeless design and high-quality materials. Designers love the BJÖRKSNÄS series for its elegant design and functional storage solutions.
The PERSHULT Shelf is a simple metal shelf bracket with a minimalistic design that can be paired with various shelf boards, making it versatile and affordable for creating custom shelving. Recommended by interior designers for its simplicity and versatility, it is perfect for creating personalized shelving solutions.
The MALM Dressing Table is versatile and features a clean design with a drawer. It’s perfect for bedrooms or as a stylish desk. This dressing table is a favorite among designers for its sleek design and practical storage.
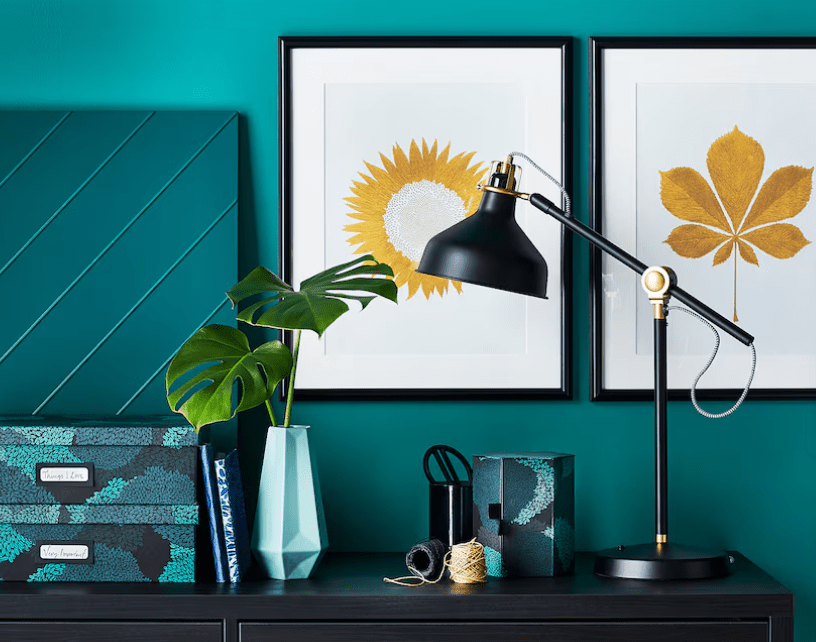
The RANARP Work Lamp is an industrial-style work lamp with brass accents, making it a stylish and functional addition to any desk. Designers recommend the RANARP Work Lamp for its vintage-inspired design and excellent task lighting.
The KVARNVIK Storage Boxes are elegant linen storage boxes with labels, providing a sleek design that blends well with various decor styles and keeps storage organized. Designers appreciate these boxes for their aesthetic appeal and practicality in organizing space.
The DYTAG Linen Curtains are soft and available in a natural color. These extra-long curtains offer a designer look at an affordable price. Recommended by designers for their luxurious feel and ability to soften any room’s look
The MAJGULL Curtains are room darkening, providing privacy and blocking out light. Their stylish design enhances any room while offering functionality. These curtains are praised by designers for their excellent light-blocking capabilities and elegant appearanc
The VITTSJÖ Shelf Unit is a black metal and glass shelving unit that can be painted in gold or other metallic shades for a high-end appearance. It offers ample storage and display space. Designers like Nick Lewis recommend the VITTSJÖ Shelf Unit for its adaptability and stylish design, making it a popular choice for modern interiors
The MOSSLANDA Picture Ledge is a simple and versatile ledge designed for displaying photos, art, and other decorative items. It can be easily painted to match your wall color for a custom look, making it perfect for creating personalized gallery walls. This product is favored by designers for its versatility and ease of installation, allowing for quick and stylish updates to any room.
Lone Fox praises the MOSSLANDA Picture Ledge for its practicality and how it helps to create a dynamic display without taking up much space (The Spruce). Similarly, Nina Takesh highlights its simplicity and adaptability, making it an ideal choice for various decor styles (MyDomaine).
These endorsements underscore the MOSSLANDA Picture Ledge’s popularity among interior designers, who appreciate its ability to blend seamlessly into different environments while offering functional and aesthetic benefits.
The MARKFROST Table Lamp features a marble-effect base and a handblown glass shade, adding an elegant touch to any room with its warm LED glow. This lamp is perfect for creating a romantic and sophisticated ambiance.
Interior designer Nina Takesh highly recommends the MARKFROST Table Lamp for its unique design and luxurious appeal. She emphasizes its high-quality materials and craftsmanship, which make it a standout piece despite its affordable price (MyDomaine). Similarly, Lone Fox appreciates its versatility and how it complements various interior styles, from modern to traditional (The Spruce).
These endorsements highlight the MARKFROST Table Lamp’s popularity among designers, who value its combination of style, functionality, and affordability.
Conclusion
These 21 designer-approved IKEA products are perfect for transforming your home into a stylish and luxurious space without breaking the bank. Whether you’re looking for hidden gems, the best IKEA products, the best IKEA furniture, or IKEA favorites, these items will help you achieve a high-end look on a budget. From versatile storage solutions like the BESTÅ Storage Unit and IVAR Shelf Unit to elegant decor pieces like the MOSSLANDA Picture Ledge and MARKFROST Table Lamp, these recommendations from top interior designers ensure that you can elevate your home decor effortlessly. Happy decorating!
Imagine waking up every day in a bedroom that feels like a five-star retreat. The secret to achieving this luxurious feel lies in the latest bedroom design trends of 2024. Catch the YouTube Video here below, or read on for our full post…
Today we’ll explore innovative bedroom decor ideas that will give your space an elegant and modern makeover. From statement lighting to minimalist elegance, and bold wall murals, these trends will elevate your bedroom to new heights. Plus, stay tuned for three money-saving hacks at the end to help you achieve these luxurious looks on a budget!
Statement Lighting: Illuminate with Style
Lighting is a crucial element in setting the ambiance of your bedroom. Amber Lewis of Amber Interiors highlights, “A statement chandelier or unique bedside lamps can elevate the entire room and serve as a focal point that draws the eye and adds a touch of luxury.” Imagine a chandelier so beautiful, it makes you want to get dressed up just to go to bed. Good lighting can change the mood of your room entirely. Think about layered lighting – combining overhead lights, task lighting, and accent lights to create a warm, inviting atmosphere. Even the choice of light bulbs can make a difference; opt for warm white LEDs to mimic natural sunlight.
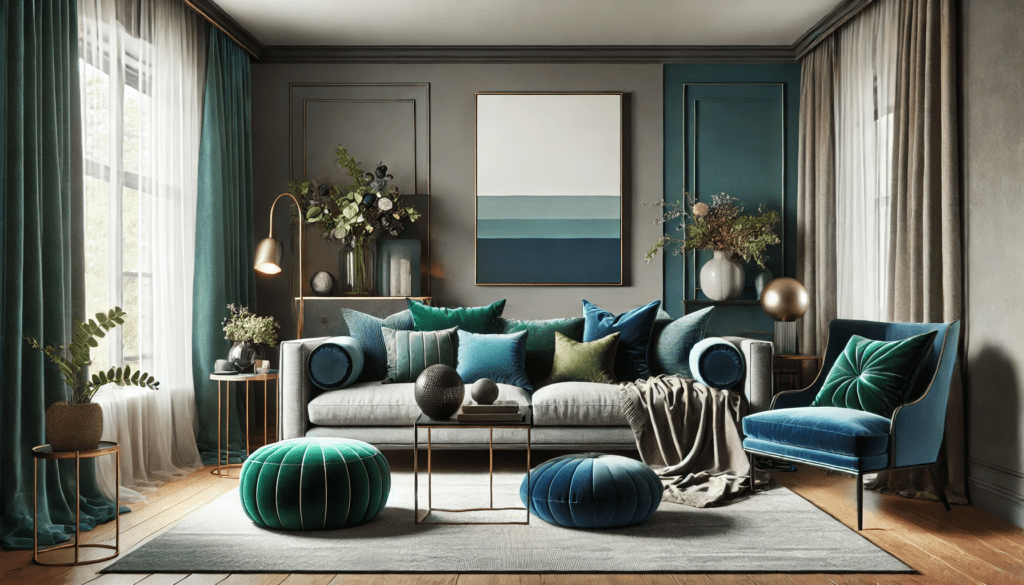
Balancing Bold Colors: Create Depth and Personality
Next up is the challenge of balancing bold colors. Emily Henderson, known for her mastery of mixing patterns and colors, says, “Bold colors add personality and depth, but it’s essential to balance them with neutral tones to maintain harmony.” Think of bold jewel tones like emerald green or sapphire blue paired with soft, neutral grays. It’s like a stylish superhero duo! When using bold colors, start with small accents like throw pillows or a statement chair. Gradually introduce larger elements, ensuring the room still feels cohesive and inviting. And don’t forget to play with textures – mixing velvet, silk, and linen can add rich layers to your decor.
Embracing Minimalist Elegance: Less is More
As our journey continues, we embrace minimalist elegance. Nate Berkus, renowned for his timeless designs, shares, “Less is more when it comes to luxury. A clutter-free space with clean lines and simple decor can create a peaceful retreat.” Imagine a bedroom with sleek, built-in wardrobes and a minimalist platform bed. It’s so clean and tidy, you’ll actually want to keep it that way – who knew that was possible? Minimalist design isn’t about having less; it’s about making room for more – more peace, more clarity, and more enjoyment. Invest in high-quality pieces that serve multiple purposes, like a stylish bench that offers storage. Keep surfaces clear of unnecessary items to let the beauty of your furniture and decor shine.
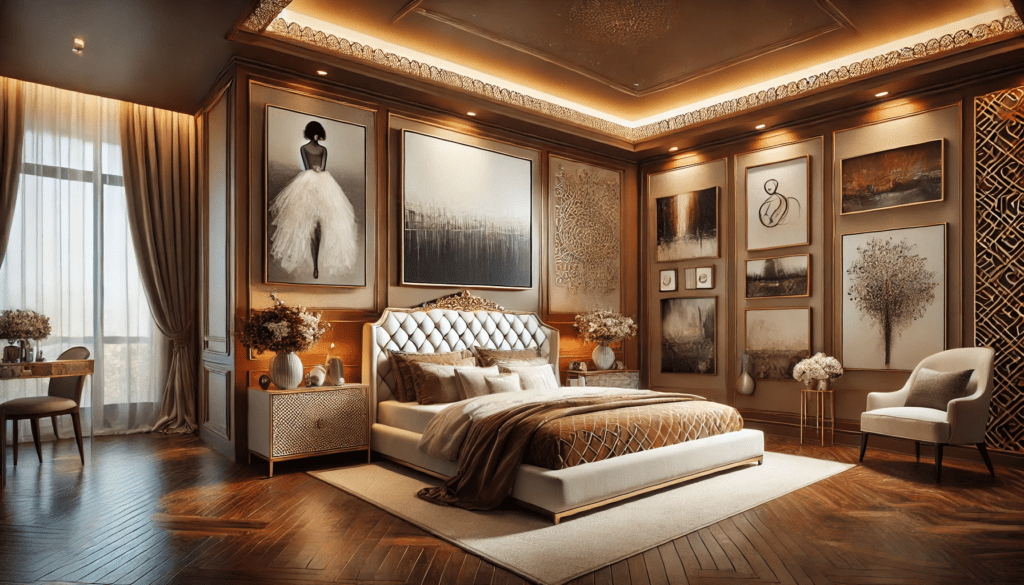
Choosing Art for a Luxury Feel: Personalize Your Space
Now, let’s talk about adding art to give your bedroom a luxury feel. Designers like Kelly Hoppen advise, “Choosing art is about finding pieces that resonate with you and fit the color scheme and style of your room.” For a luxurious touch, look for large-scale pieces or a curated gallery wall. Martyn Lawrence Bullard suggests, “Invest in pieces that you love and that will stand the test of time.” Imagine a statement piece above the bed or a collection of smaller artworks that tell a story. It’s like dressing your walls in designer clothes. Art can be a reflection of your personal journey and experiences, adding a deep, emotional layer to your decor. Don’t be afraid to mix different styles and mediums to create a gallery that’s uniquely yours.
Textured Surfaces: Add Depth and Warmth
Textured surfaces are key to creating visually interesting and inviting spaces. This trend includes materials like stone, brick, woven fabrics, and bespoke finishes such as Venetian plaster and fluted wall paneling. Texture adds depth, dimension, and a tactile experience to a room, making it feel more welcoming and warm. Incorporating textured surfaces can transform flat, boring walls into rich, layered backdrops that add character to your bedroom. Think of a textured accent wall behind your bed or a woven fabric headboard to give your room a cozy, luxurious feel. Additionally, use textured throws, pillows, and rugs to add layers of comfort and sophistication. Mixing different textures like leather, wool, and silk can make your space feel more dynamic and rich.
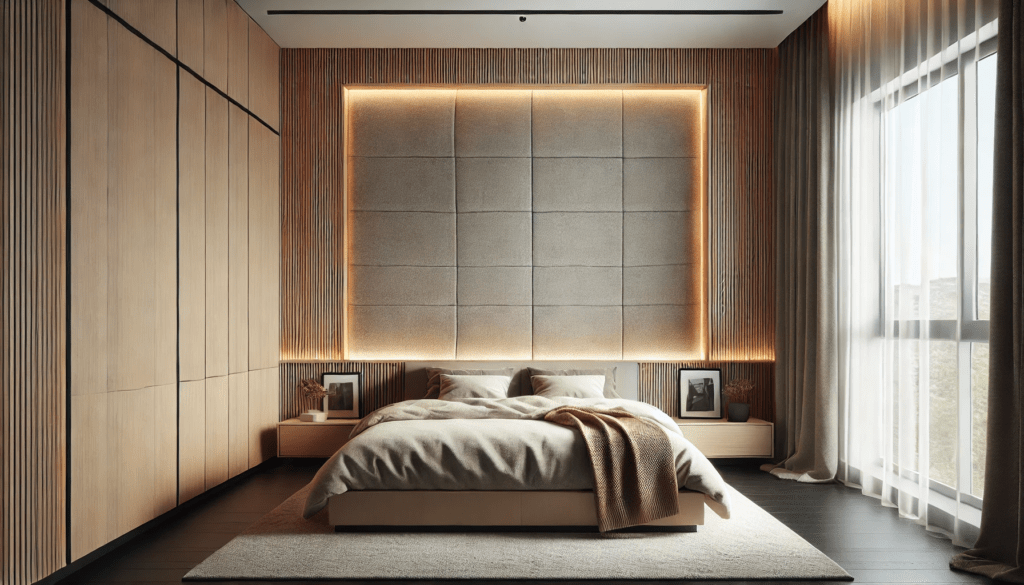
Latest in Headboard Design: Make a Statement
Let’s talk about one of the focal points of any bedroom: the headboard. In 2024, headboard design has evolved far beyond the traditional upholstered look. We’re seeing more built-in and wall-to-wall headboards that create a cohesive and sophisticated aesthetic. According to Homes & Gardens, integrated headboards made from materials like wood, rattan, and boucle are trending, providing a seamless look that frames the entire sleeping area. This design choice can eliminate the need for additional wall art, serving as a strong focal point that anchors the bedroom scheme. Abbie Naber of A. Naber Designs highlights that these headboards not only add value to your space but also offer a permanent design feature that’s both stylish and functional.
Stylish Nightstands and Dressers: Multifunctional Elegance
Another important aspect of bedroom design is your choice of nightstands and dressers. In 2024, the focus is on multifunctional and stylish pieces that maximize space and add to the overall aesthetic. According to Decorilla, nightstands with built-in charging ports and additional storage are becoming popular, catering to the modern need for both functionality and style. Dark wood tones are also making a comeback, as noted by Homes & Gardens, adding a touch of warmth and luxury to the bedroom. These pieces are paired with light, airy colors to avoid a dark, heavy feel. Think of a sleek, dark wood dresser that not only stores your belongings but also serves as a beautiful statement piece in your room.
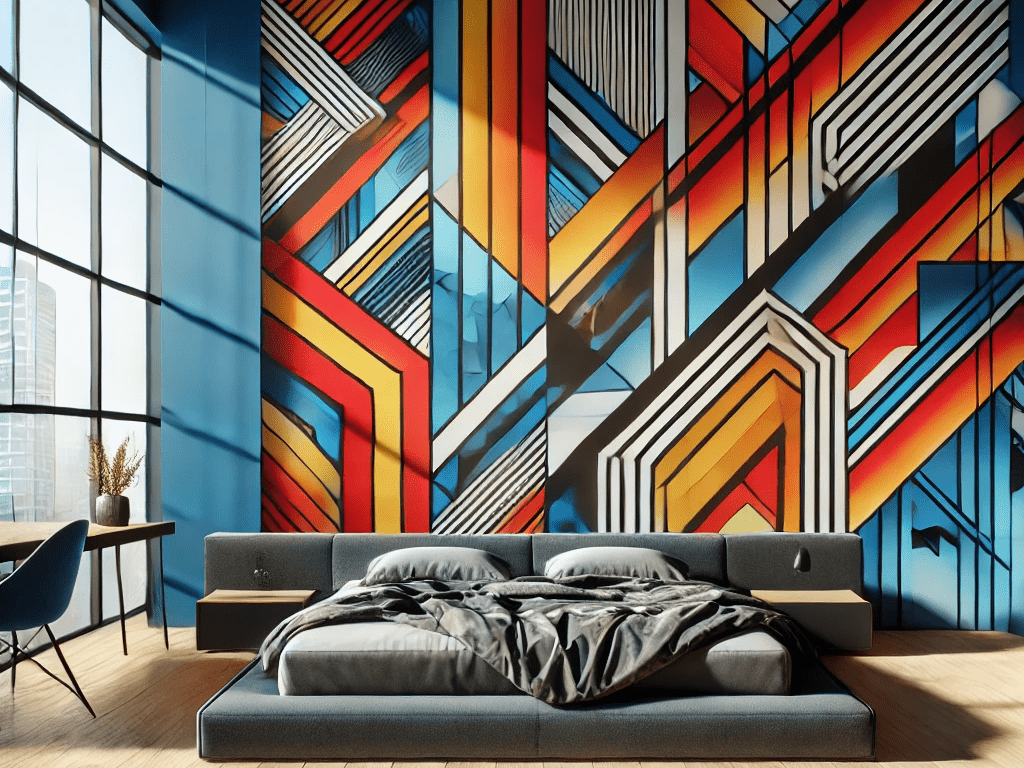
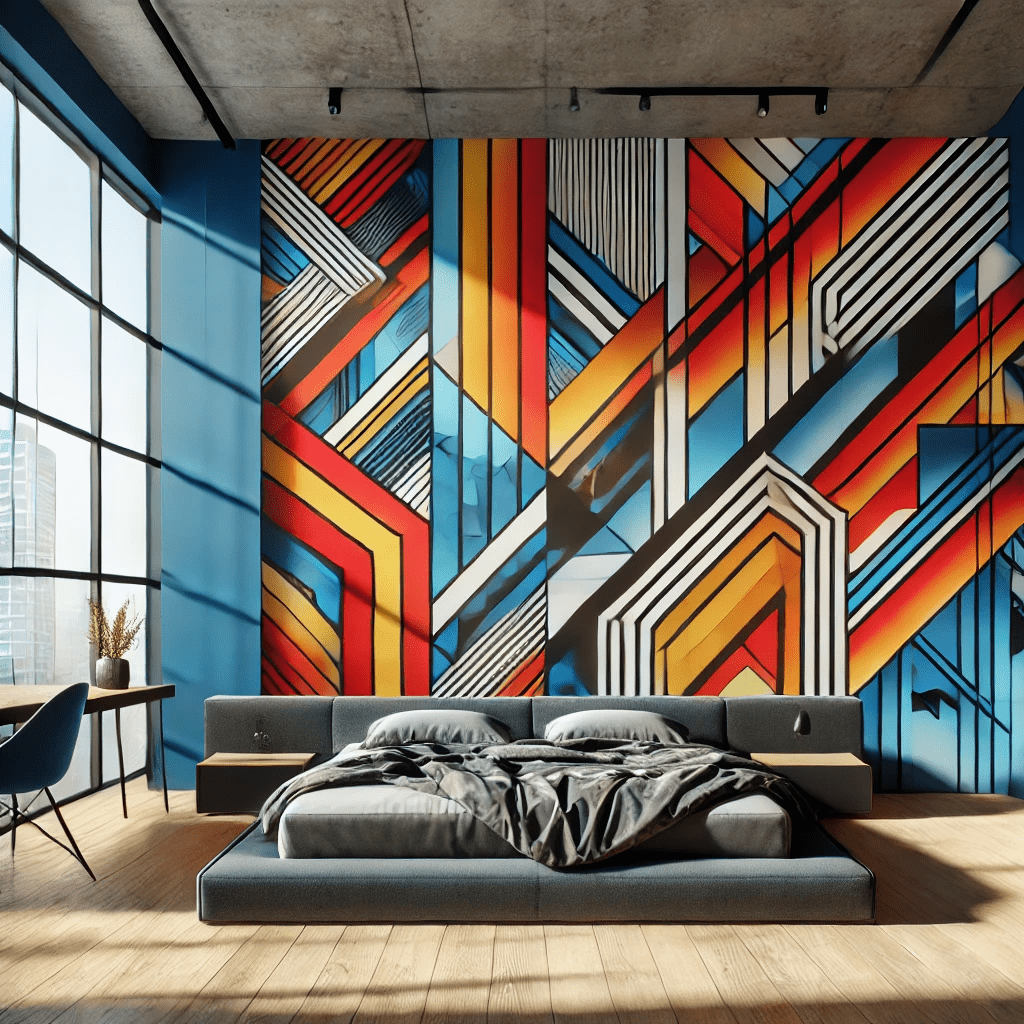
Bold Wall Murals: Make a Bold Statement
Finally, let’s end with the most surprising trend: bold wall murals. This trend is about turning your walls into art. According to interior designer Bobby Berk, “A striking mural can completely transform a room, making it feel larger and more dynamic.” Imagine a serene forest scene behind your bed or an abstract geometric pattern. It’s like sleeping in an art gallery, minus the security guards. Wall murals can create a focal point that draws the eye and adds depth to your room. They can be custom-designed to fit your personality, making your space truly unique. And don’t worry, there’s a mural for every style, from contemporary to classic.
Check out my Amazon storefront here with some of my favorite bedroom decor items: https://amzn.to/3YmeSh0
Note: These are affiliate links. As an Amazon Associate I earn from qualifying purchases. There is no extra cost to you.
Bringing It All Together
As we bring all these trends together, our once ordinary bedroom has now become an extraordinary retreat. Each element, from statement lighting to bold colors, minimalist elegance to carefully chosen art, textured surfaces, integrated headboards, stylish nightstands, and finally, the bold wall mural, plays a crucial role in this transformation. Achieving a luxury look doesn’t have to be expensive. With a bit of creativity and smart shopping, you can create a stunning bedroom that feels both luxurious and personal. So, go ahead and start transforming your space today!
Money-Saving Hacks
And as promised, here are three money-saving hacks to get these luxurious looks without breaking the bank:
Statement Lighting: Search for vintage or second-hand fixtures online or at local thrift stores. You can find unique pieces that just need a bit of cleaning or a new coat of paint.
Bold Colors: Start with accessories like throw pillows, blankets, or an accent chair. You can also paint one wall in a bold color to create an accent wall, which is less expensive than painting the entire room.
Wall Murals: Consider using removable wallpaper or wall decals. These options allow you to create a stunning mural without the cost of a custom paint job. Plus, they’re easy to change if you ever want a new look.
With these tips, you can achieve a high-end look on a budget! Until next time!
When it comes to renovating your home, it can be difficult to decide where to put your money. While you may want to make updates that reflect your personal style, it’s important to also consider which renovations will add the most value to your home. Here are the top 5 renovations to add value to your home:
Adding square footage: The most sure-fire way to add value to your home is to increase the legal, permitted square footage. Homes are valued in dollars per square foot, so you will force appreciation this way. Adding a permitted bonus room, extra bedroom, or living area will appeal to people that want a larger home.
Kitchen renovations: A well-designed kitchen can greatly increase the value of your home. Updating cabinets, countertops, and appliances can make a big difference in the overall look and functionality of the space. Additionally, adding an island or open shelving can add functionality and charm to the kitchen.
Bathroom renovations: Like kitchens, bathrooms are also a major selling point for potential buyers. Updating the tile, vanity, and fixtures can give the room a fresh and modern look. Adding a double vanity or a walk-in shower can also be appealing to buyers.
Basement finishing: Finishing a basement can add value to your home. Whether you create a cozy family room or a fully-equipped home theater, a finished basement can increase the overall square footage of your home and make it more appealing to potential buyers.
Landscaping and curb appeal: First impressions are everything, and the exterior of your home is the first thing potential buyers will see. Updating your landscaping can make a big difference in the overall appearance of your home. Planting a few trees or flowers, or adding a small garden can add character and charm to your home. Investing in a new front door or repainting the exterior can also make a big impact.
It is worth mentioning that these renovations may vary in their impact according to the real estate market of your area, the condition of your home, and your budget. It is always a good idea to consult with a real estate agent or a home appraiser to determine what renovations will add the most value to your home.
When considering a renovation, it’s important to keep in mind that the goal is not only to increase the value of your home, but also to make it more livable and comfortable for you and your family. The key is to strike a balance between personal preferences and what will appeal to potential buyers. By focusing on these top 5 renovations, you can be confident that you are making smart investments in your home that will ultimately pay off in the long run.
Preparing your house for sale can be a daunting task, but it doesn’t have to be. With a little effort and some simple changes, you can make your house more attractive to potential buyers. Here are 5 quick and easy ways to prepare your house for sale:
Declutter and depersonalize: The first step in preparing your house for sale is to declutter and depersonalize. Remove any unnecessary items and personal items such as family photos and personal collections. This will make your house look more spacious and open, and will help potential buyers to envision themselves living in the space.
Make repairs and updates: Fixing any repairs and making updates to your home can increase its value and make it more attractive to potential buyers. Consider painting, replacing old flooring or updating light fixtures.
Clean and declutter inside and out: Cleaning your house inside and out can make a big difference in how it looks to potential buyers. Make sure everything is clean and tidy, including windows, carpets, and even the exterior of your home.
Stage your home: Staging your home can make a huge difference in how it looks to potential buyers. Consider hiring a professional stager to help you make your house look its best.
Highlight the features of your home: Highlight the features of your home that make it special. If your home has a great view, make sure to showcase it. If it has a unique architectural feature, draw attention to it.
By following these tips, you can prepare your house for sale quickly and easily. Remember, decluttering and depersonalizing, making repairs and updates, cleaning and decluttering inside and out, staging your home, and highlighting the features of your home are key to make your house more attractive to potential buyers.
Another option to sell your house, is to sell to a local home buyer such as Penny Modern Properties. We will give you a fair offer for your house or condo, WITHOUT you needing to make any repairs. No staging, no cleaning, and you can even leave any unwanted items behind.
Call today at (619) 719-1820 to get your offer before spending your hard-earned cash on a bunch of repairs and upgrades.
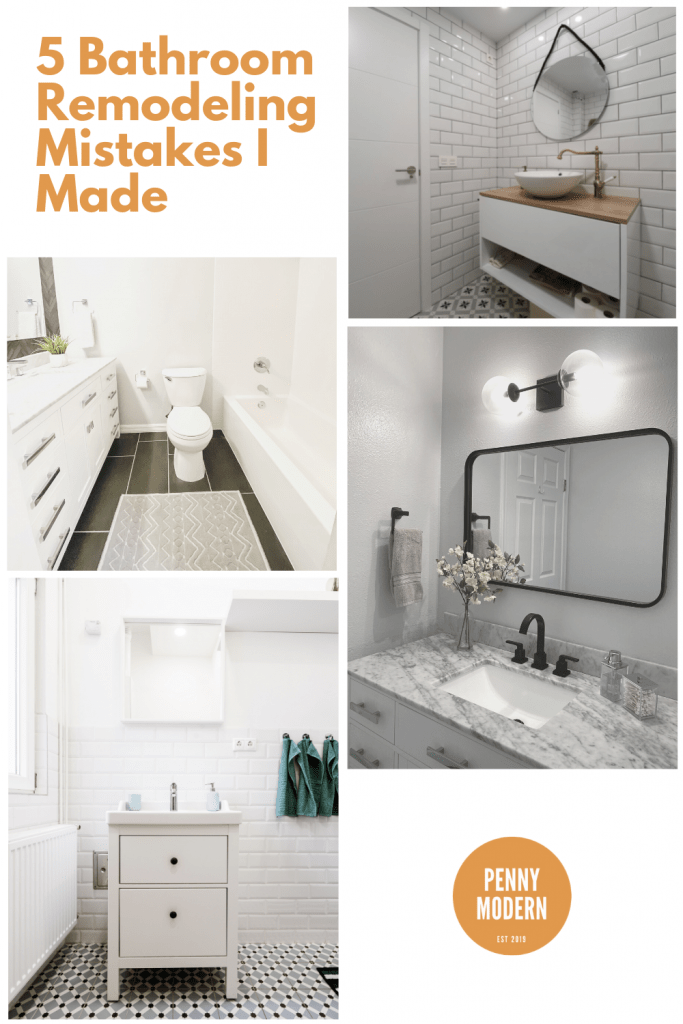
Well, how would it help you if I told you the 5 biggest mistakes I made when remodeling our TWO bathrooms last year?
It would totally help you out right? I’m sure it would give you more confidence in doing your own DIY bathroom remodel, so you can create the bathroom of your dreams (on a budget of course).
Well today I am going to cover 5 different mistakes we made when we did our own DIY bathroom remodel last summer. Some of the bathroom remodeling mistakes we’ll cover are:
Not budgeting enough time
Not building a solid budget
Improper planning for storage
Dim vanity lighting
Choosing too trendy of features.
We learned a lot, and I wanted to pass on the biggest bathroom renovation lessons I learned to you. So read on, and let’s get started droppin’ knowledge.
Disclosure: This post contains affiliate links. As an Amazon Associate I earn from qualifying purchases, at NO extra cost to you.
Mistake #1 – Underestimating how much time everything takes to DIY
Pin to Pinterest for reading later…
We are not hard core DIY’ers so everything took longer than expected, and we only took 1 week off work for remodeling TWO small bathrooms (except for the shower/tub area).
We built a little timeline at the beginning (based on loose estimates), but the DEMO day took way longer than we thought. We did find asbestos flooring almost immediately so that put us a stop on one bathroom, so we switched to working on the other one.
More tile = More time
Another thing we underestimated on our timeline – tile!
Tile requires TONS of prep work: leveling the floor, laying backerboard (which has to be mortared then dry), laying the mortar and tile (which then has to dry 24 hours before grouting), then applying grout.
Here are a couple of awesome YouTube videos about prepping and laying tile, they should totally help you budget enough time:
Anyways – make sure to budget AT LEAST an extra day in your timeline to cover for any unexpected delays. Maybe more if this is your FIRST time remodeling a bathroom.
Mistake #2 – Not building out a solid budget
Changing the design plan can blow your budget
We definitely spent more money than we thought we would. Part of what threw us over is we decided to do a pocket door mid-way through the project. That really threw us over budget.
Sometimes you get going on your project and a contractor might say, “it’s better to do it now, while the wall is open.” Or at least we did.
Maybe you’ll find something nasty that you have to fix: dry rot, termite damage, water damage, mold, asbestos, etc.
Or maybe you want to change something at the last minute, or someone suggests a better finish or newer gadget halfway through the project.
So to stay within a set budget – add at least 10% contingency to your bathroom remodeling budget for the unexpected. Running out of money (or going into major debt) is a major bathroom remodeling mistake.
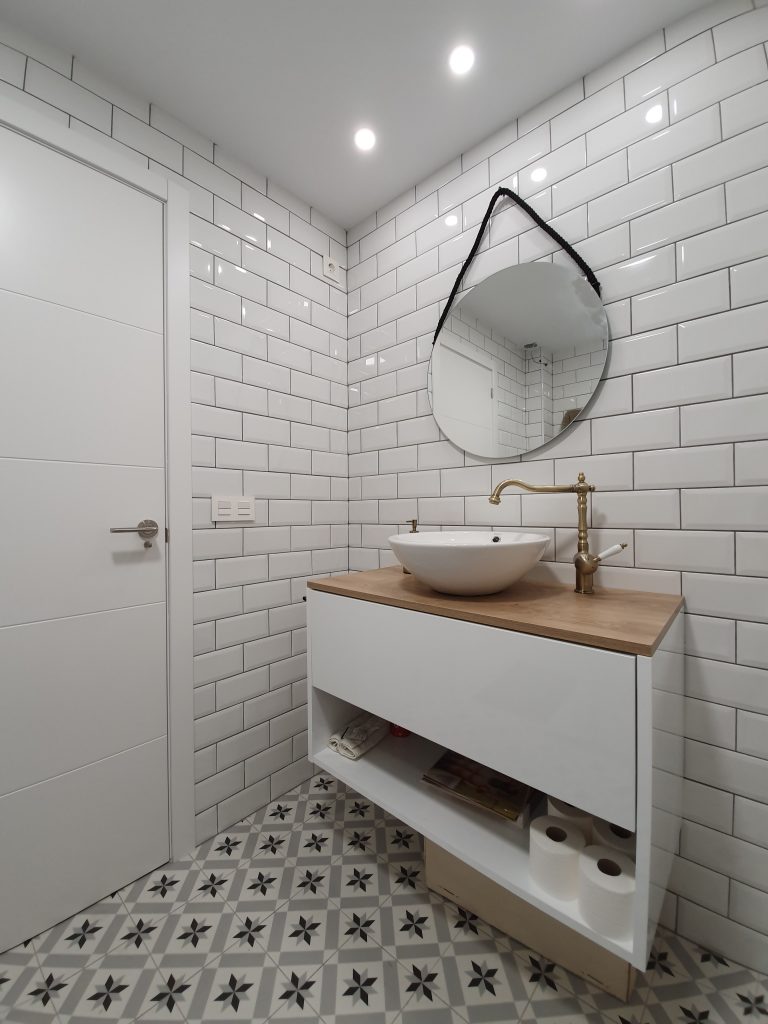
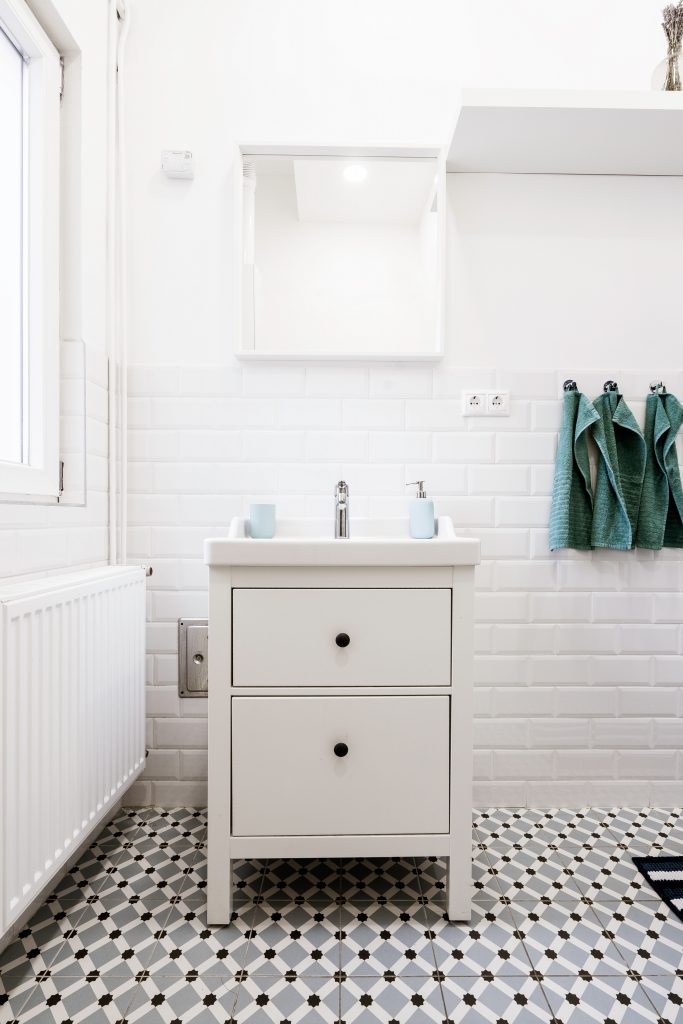
No towel bars for bath towels in our guest bathroom
Storage is super important in any bathroom – especially if it’s small. Make sure you plan storage solutions for all your grooming supplies, makeup, cleaning supplies, etc.
In the shower/tub area – make sure you plan a spot to put shampoo, body wash, and so on. Just putting stuff on the floor is no bueno.
When we re-did our tiny guest bathroom we left one thing out – somewhere to hang our bath towels! The previous owners had a towel bar above the toilet and I hated it. I just think it’s gross to put your towel over the toilet but there is literally no other good spot to hang it.
We previously had a hook on the back of the door for towels. However, when we decided to put in a pocket door, that option went away.
I did find some suction cup hooks from Amazon that work pretty well for towels. I just stick it to our acrylic shower wall. These are similar to what I bought:
My advice is to think about wall your storage solutions well in advance when you plan out your space – even down to placing towel hooks and bars.
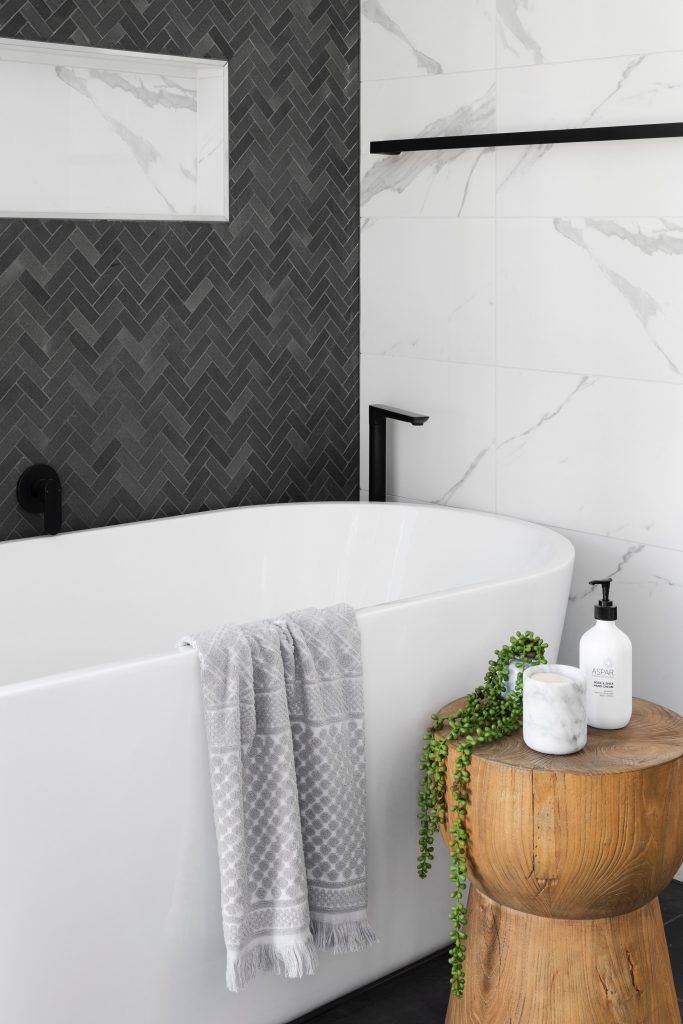
Towel bar above the bathtub is a good spot
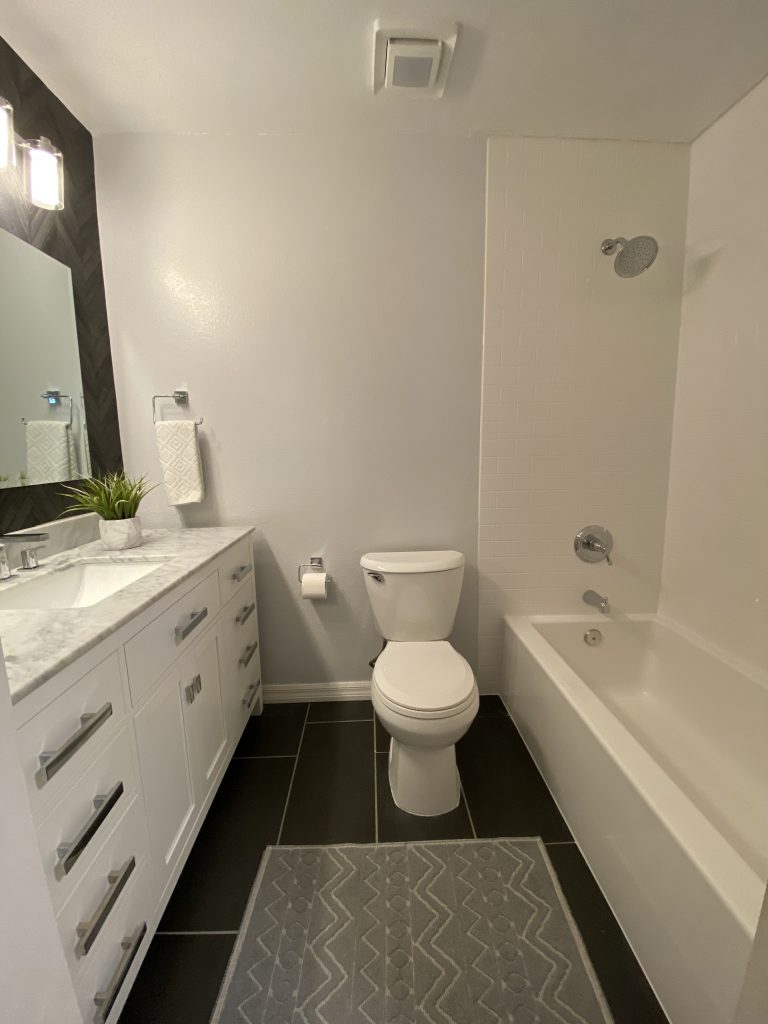
Mistake #4: Dim Vanity Lighting
Make sure lighting is bright enough for grooming
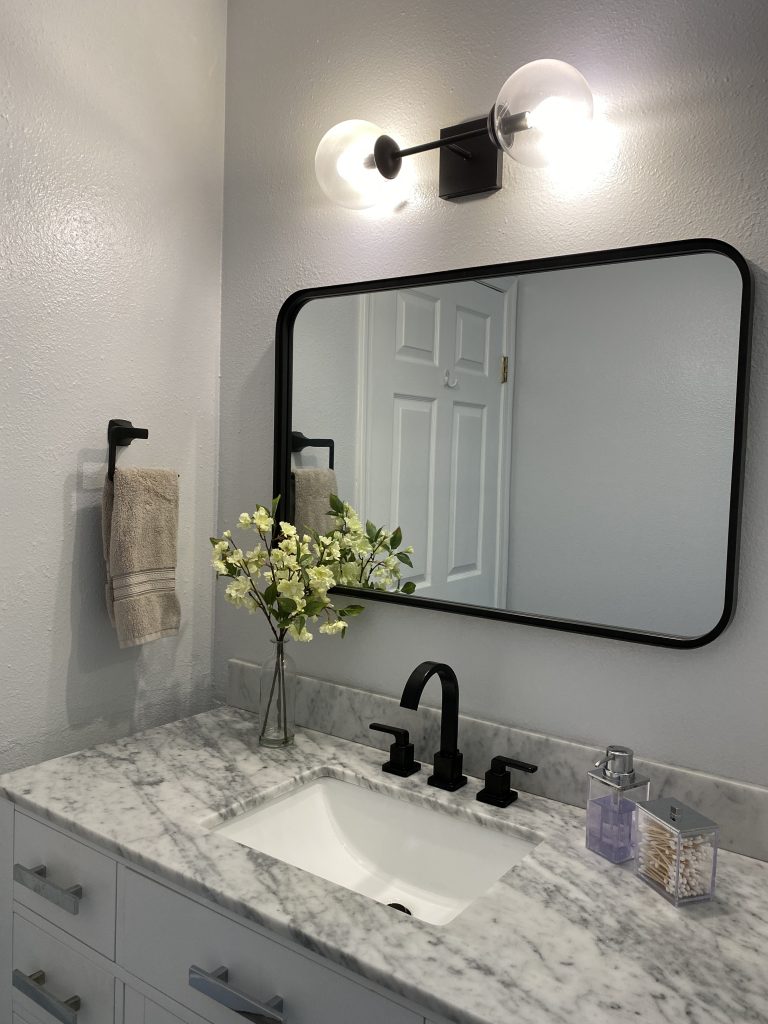
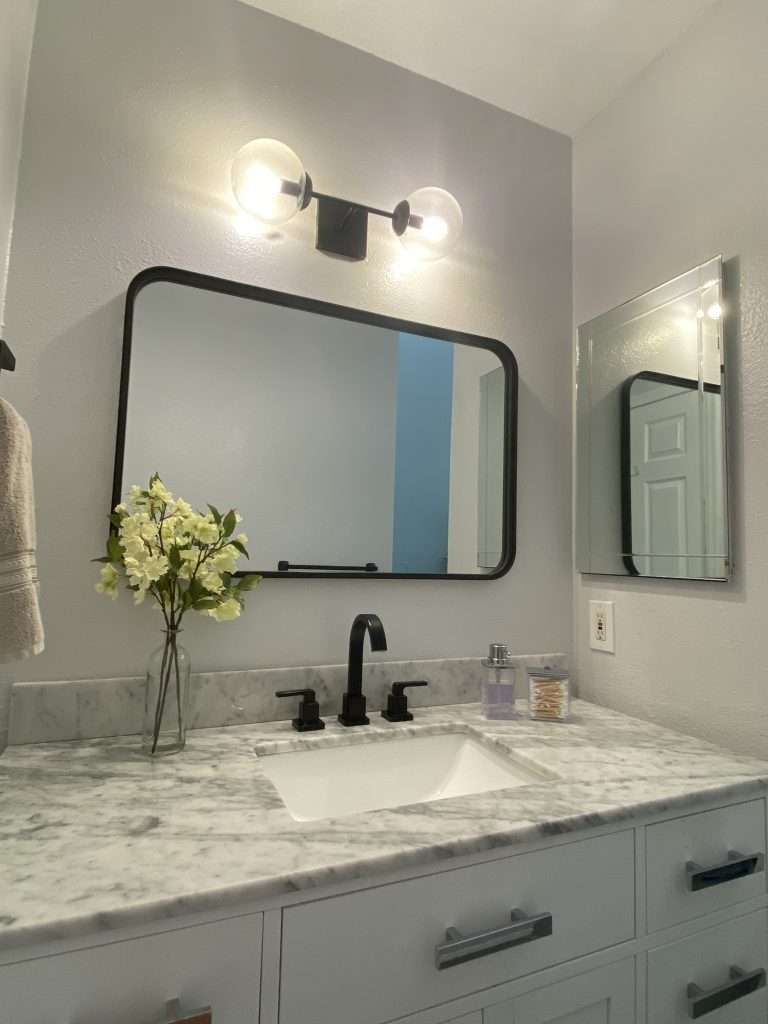
So we decided to use a “sconce” in place of a traditional vanity light. This sconce has 2 light bulbs with a crystal clear globe shade. When I put the first light bulbs in, it was WAY too bright. So I had to use 40 Watt equivalent warm light bulbs to avoid searing my eyelids off.
Anyways, these “naked” bulbs are not the most ideal light to see to do makeup, grooming, etc. A more traditional “frosted” lamp shade (like below) would help diffuse light properly, and might have been a better choice.
More traditional vanity light helps diffuse light properly
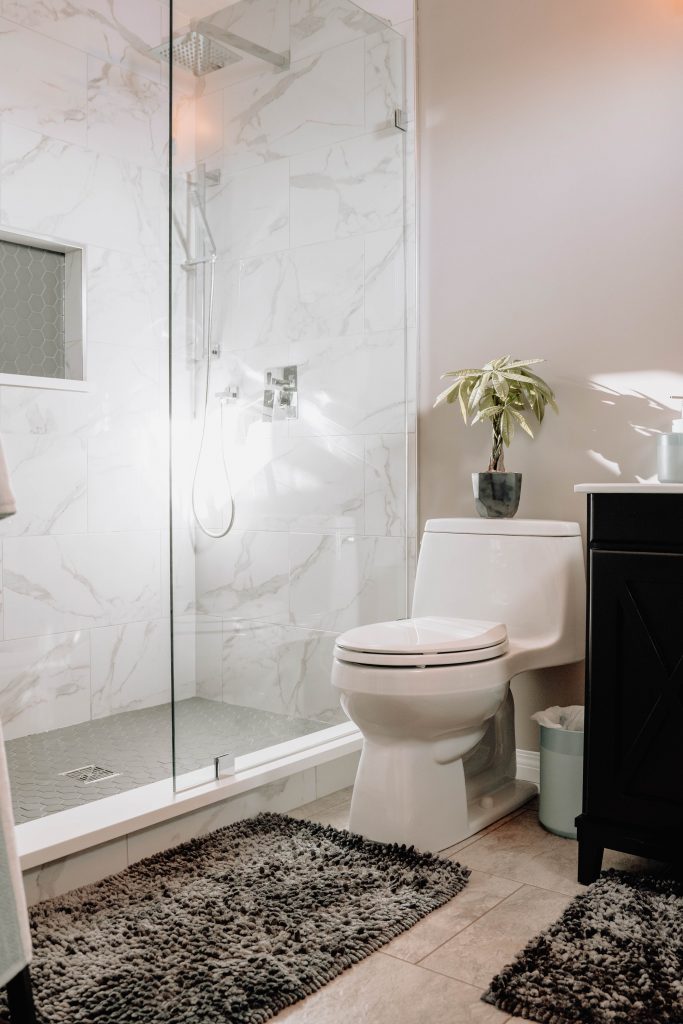
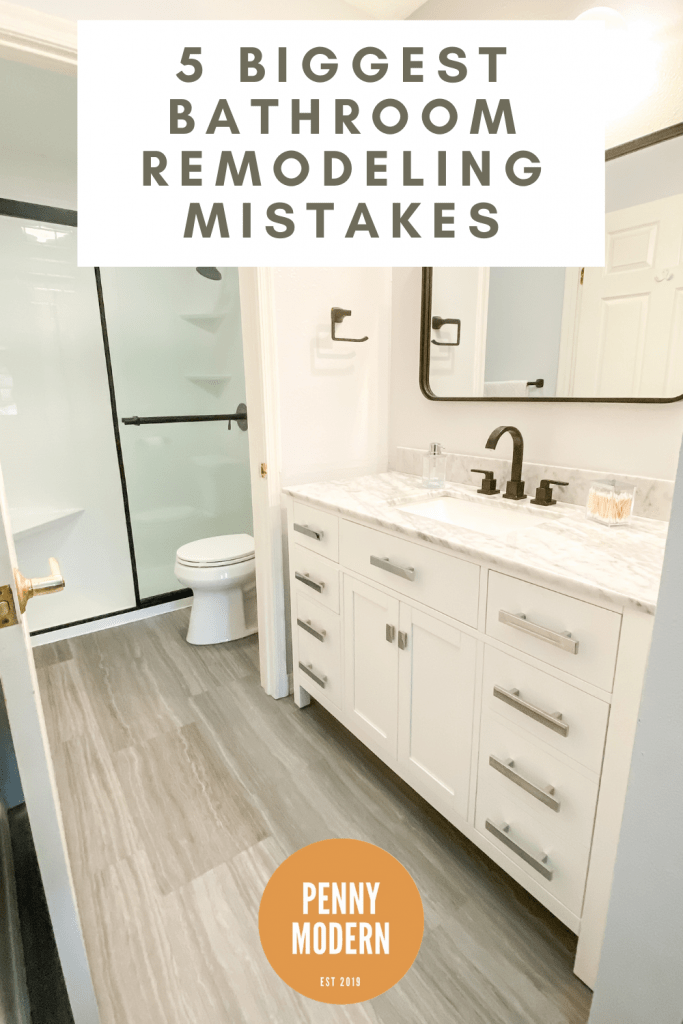
Mistake #5: Choosing too trendy features
So we all want our bathrooms to be “in style” right? Well, I love embracing trends, but I am a firm believer that choosing classic, timeless features will not only improve the home’s resale value, but will help your bathroom design stand the test of time.
I mixed classic and more trendy features with my bathroom design
One bathroom remodeling mistake I made was buying a more trendy mirror and vanity light (above) that are black metal finishes. I mixed this with my more classic vanity in marble and white.
My thought process was, if the mirror and light go out of style, they are MUCH easier to change than an entire vanity.
So if you want to embrace trends – pick items that are easy to change out: mirrors, lights, faucets, paint, etc.
Patterned tiles can be trendy – choose wisely
Pick more classic, timeless finishes such as your vanity, countertop, flooring, and shower/bath design. The patterned tile floors I see so often today make me cringe as I fear they will be out of style quickly. Changing out tile is a huge pain!
Wrap Up
Like this post? Pin it to Pinterest to help others find it…
Well I hope this “reveal” of my biggest mistakes helped you out in designing your bathroom of your dreams.
The biggest bathroom remodeling mistakes we reviewed were: Not budgeting enough time, not building a solid budget, improper planning for storage, dim vanity lighting, and choosing too trendy of features.
Which mistake makes you cringe the most? I’d love to hear in the comments below! Also feel free to ask me any questions if you think you are making a mistake in your own bathroom design – I’d love to help!
This website uses cookies so that we can provide you with the best user experience possible. Cookie information is stored in your browser and performs functions such as recognising you when you return to our website and helping our team to understand which sections of the website you find most interesting and useful.
Strictly Necessary Cookies
Strictly Necessary Cookie should be enabled at all times so that we can save your preferences for cookie settings.
If you disable this cookie, we will not be able to save your preferences. This means that every time you visit this website you will need to enable or disable cookies again.